

sometimes it's hard to get the perfect summer waves.
trust me.
it's taken a lot of practice for me to get it down.
hopefully with this tutorial will help teach you what's taken me
a long time to figure out!

hairspray: i would recommend using a flexible hold.
i use paul mitchell's worked up.
curling iron: the smaller the iron, the tighter the curl/wave.
it also depends on your length of hair.
if you have longer hair, use a 1" to 2" iron.
if you have shorter hair, use a 1/2" to 1" iron.
how to:
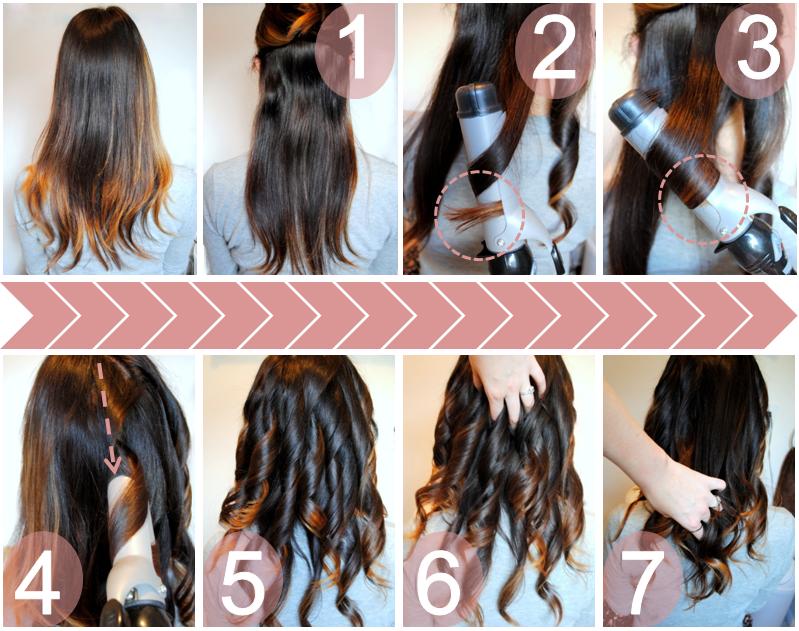
1
split your hair into sections, starting at the bottom.
2
take a section of hair & spray with hairspray.
begin wrapping the hair in a spiral around the outside of the curling iron,
leaving the ends of the hair out.
the clasp of the curling iron should only be used to hold the ends of your hair.
the rest of the hair should be wrapped around the outside and over the clasp of the iron.
curl hair all the way to the scalp & hold for 15 - 20 seconds.
the reason for leaving the ends out:
the ends of your hair curl the fastest & hold the curl the best.
curling the mid-shaft & up toward the scalp is what's important.
to make sure that area gets the hottest part of the iron for the longest amount of time,
you leave the ends out.
3
now that the mid-shaft to scalp area has been curled,
partially release the clasp of the iron & work your ends through.
this part is a bit tricky...
try NOT to unroll all the hair that you've got wrapped around the iron.
try to keep it all wrapped,
close to the scalp while working the ends through.
once your ends are in the iron, hold for another 15- 20 seconds.
4
when releasing your curl, don't slide the iron out...
twist it out.
release the iron's clasp & twist the curling iron out of the curl.
5
once your curl is free from the iron,
leave it alone.
don't brush it.
don't run your fingers through it.
you need to let it cool down.
your curls will hold better.
i would recommend leaving all your curls alone until you have finished curling all your hair.
6 & 7
starting at the top of your head, run your fingers through your hair.
this will give the curls more of a piecey/beachy look.
if you choose to comb through the curls,
you'll get more of a 1950's smooth wave.

let me know how your summer waves turn out!
♥elisabeth
10 comments:
thank you for this - my hair is always so reluctant to stay curly! you have such pretty hair :)
I am loving this hair tutorial!!! My hair isn't as long but I'll definitely try this! :)
I wish you could do my hair everyday.
xo,
Sarah
Ohhh can't wait for my hair to grow a little longer!
Your hair looks lovely! I'll definitely have to give this a try.
And do you know that I am absolitely in love with your blog header??
You have gorgeous hair!!! :) Thanks for this tutorial... actually seems like something I could do myself! Yippee! x
Oops, and by your hair, I mean Sarah's hair. Either way, this is lovely. :)
I am slowly growing my hair out, and this post just made me a bit more impatient. Can't wait to try the beautiful curls out on m'self.
Great tutorial! Definitely need to try on my own!
Oh, how you rock for giving us this tutorial! I'm a hair dummy so I'm super appreciative! :) Can't wait to try your tips out! Thank you!
Notes She Wrote
Post a Comment